In-Person Research Overview
Many people are sensitive to visiting unfamiliar businesses right now due to fears of COVID-19 exposure. This can be disheartening to researchers, especially when businesses put in considerable time and effort to disinfect surfaces to make things safer. However, as long as COVID-19 is top of mind, these risks will discourage most people from participating in a study unless they have evidence that supports the contrary.
Here are a few general recommendations that should help encourage participation in your in-person study:
Keep the study session short.
Modify your study design to keep sessions at 30 minutes or less. Participants may feel that their risk for exposure is lower if the study is brief. Of course, this will lead to difficult decisions about the scope of your study, and what matters most. This can be a healthy exercise to engage in as researchers anyways — one which we rarely needed to do a few short months ago.
Limit or eliminate any physical interactions between participants, researchers, and study materials.
While many studies can be conducted successfully through remote research tools, sometimes you just need the participant in-person to see something or show you something. It may take some creativity, but useful studies can still be conducted without the participant and researcher touching a prototype, or being in direct contact.
Use electronic payment methods for participant compensation.
Many researchers are doing this already. However, for those that haven’t yet, options like PayPal, Venmo, Zelle, Amazon gift cards, or even direct wire transfers are all viable options. Just be mindful of how much you are paying participants. For some highly qualified and compensated user groups (e.g., surgeons), they may have to fill out tax forms as well.
Send out a separate email to participants regarding your PPE use and cleaning procedures.
Simply knowing that your business is using PPE, and has a cleaning procedure in place may assuage participants. You might even consider sending out a brief video demo walking participants through your cleaning protocol for supplies they’ll interact with during their session. This is “proof” to them that you are taking their health seriously.
Decide ahead of time what your boundaries are with participants.
As we know from many psychology experiments over the decades (see Freedman & Fraser, 1966; Schwarzwald, Bizman, & Raz, 1983), people are more likely to say “yes” to a request after initially agreeing to a smaller request. Due to the fact that a person has agreed to participate in your study, they may be more likely to agree to other requests without much thought. For example, you might be tempted to ask if you can place a camera in the back of their vehicle — you know, where it’s “safe” — to get a better view.
Just because they say “yes” doesn’t mean it’s a smart thing to do. As the researcher, you need to set the boundaries for safety in your study and stick to them. These “do’s” and “don’ts” can also be communicated to your participant via email ahead of time. Transparency builds trust.
Curb-Side Research
One option for in-person research is to borrow from a model that is sustaining the food industry: curb-side pick-up. But instead of burgers and fries, you’re offering up curb-side research (hold the pickle). Simply put, a curb-side study involves a participant driving to a study location, and completing the study session from the safety of their vehicle while the researcher helps facilitate the session from a safe distance away.

As the participant arrives in their vehicle, they would call the researcher (ideally) via a Bluetooth connection from their vehicle. This connection allows for a continuous, non-invasive means of communication to use throughout the study. Alternatively, task instructions could be emailed or texted to the participant, or they could even be written on cue cards or a digital display by the researcher.
In some cases, such as an evaluation of existing mobile apps, the participant would never need to roll down their window. If you are researching an app that can be mocked up through prototyping platforms, consider designating a QR code that participants can scan through their car window.
Unlike a URL link sent out before the study begins, a QR code gives your research team the ability to create new codes, and direct participants to new releases as they invariably get pushed during the day of testing to fix bugs.

In other cases, the participant might need to interact with a physical prototype or device. This added factor presents little risk to the participant or researcher with proper precautionary steps and disinfection between uses. In these situations, researchers should wear personal protective equipment (PPE), such as gloves and face masks to make things even safer. Just be sure to dispose of this equipment between participants to reduce the possibility of cross-contamination.
Ratings
Need to get in-the-moment ratings from the participant? No problem. Set up a set of cue cards or a display with a predetermined set of choices, read the question or statement, and ask the participant to give their response. To speed things up, assign a number to categorical choices (e.g., “strongly agree”), and ask the participant to only indicate the number itself in their responses.

In our internal study, we gave the participant a laser pointer in addition to the prototyping tablet in the beginning of the study session. This is especially helpful when the participant needs to give feedback on specific design details. They can use the laser pointer to direct attention to controls or surfaces, much like they would by hand in a traditional, face-to-face usability study. Other uses might include studies where items need to be sorted and ranked.
In this situation, the participant simply points to the item, and the researcher serves as the participant’s hands outside the vehicle. While the participant could certainly read each item, our experience was that this took too much time without adding value to the study.
A/V
As far as A/V needs are concerned, researchers can still set up cameras outside the vehicle. If the participant has heavy tinting on their windows, check to see if they have an untinted sunroof that would suffice instead. Or, ask the participant to re-park in a location that provides better lighting for the camera’s purposes. If the study involves a GUI interface (e.g., infotainment, phone screen), ask the participant to increase the brightness of the display.
In our internal study, we equipped the study moderator with a handheld GoPro. The benefit of this approach was that the moderator ensured that the camera was positioned correctly most of the time, and they could reposition the camera as needed when the participant adjusted the position of the tablet.
The downside was that it prevented the moderator from easily holding other equipment, such as a clipboard or task instructions. Plus, they had to be vigilant about making sure the camera was pointed in the appropriate direction. To offset this latter issue, a camera or gimbel with face tracking capabilities could be used if you always wanted to film the participant’s face.
Pop-Up Research

With the summer months approaching, many companies that operate in areas with favorable weather conditions should consider conducting a study outdoors. Low-cost equipment such as a pop-up camping tent can make for an excellent impromptu, shaded lab environment. The value in this approach is that a participant can easily walk up to the (unoccupied) outdoor lab, complete the study using materials set up ahead of time, and be on their way. There is no need for the study moderator to be in direct contact with the participant.

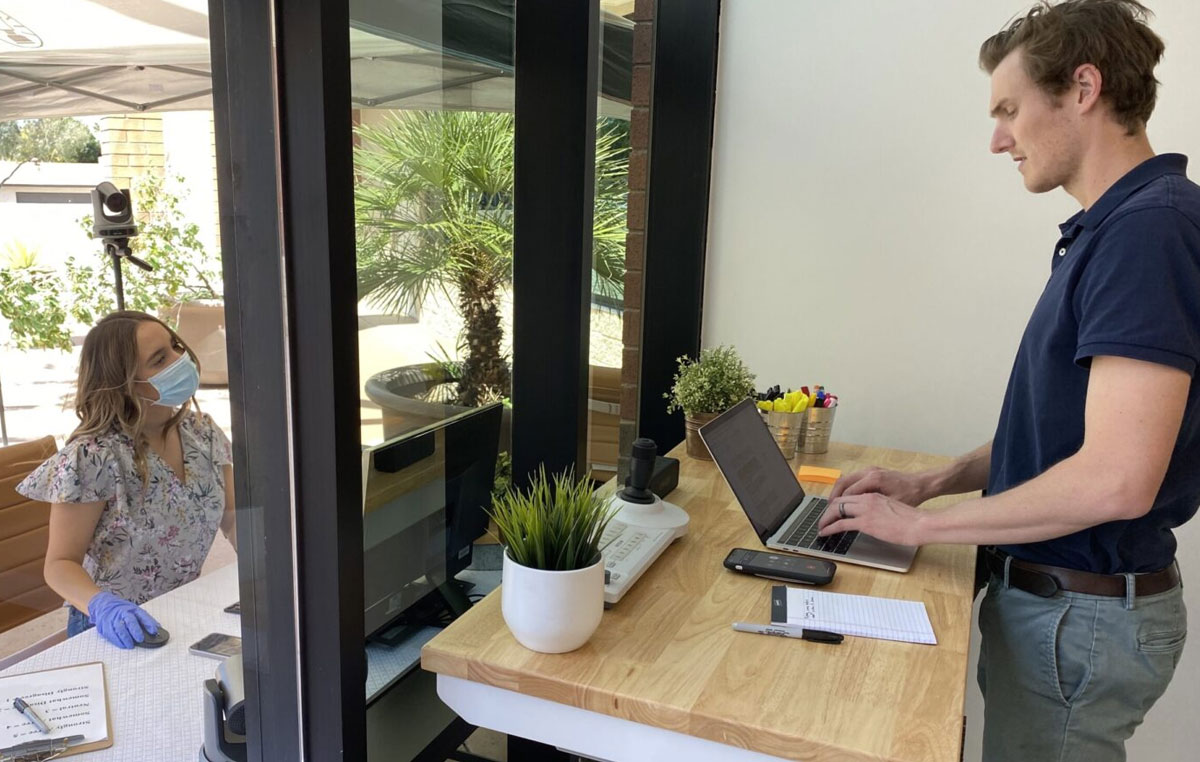
If your space allows it, consider setting up your outdoor lab next to a glass entryway or large window so that you can still see your participant. That way, you get the benefits of direct observation, much like you would in a regular usability lab equipped with a one-way observation mirror. When we conducted our internal study with this approach, it felt a lot like conducting a “Voice of God” study — that is, providing study instructions to the participant from the observation room via a telecommunication system (e.g., loudspeaker).
Glass Partitions
On the other hand, if your space doesn’t have a glass door or suitable window, consider purchasing or putting together a simple plexiglass partition to separate the researcher and participant. There are many off-the-shelf options available that are intended to be placed on a large table or desk.
One use-case for this approach would be to have the participant mark-up a design sketched onto the transparent partition. The researcher (or designer) and the participant could work together to modify the design from opposite sides of the glass — the researcher maintaining the “master” copy on their side, and the participant making suggestions on their side of the glass.

Power
Need a power outlet for equipment? Consider using a set of external batteries designed to run larger equipment. (Tip: we personally like the 150 or 300 watt Ryobi inverter for the One+ system for its portability, ease of use, and cost-effective rechargeable batteries). We suggest setting up at least two batteries — one to use in real-time, and another to swap out as the first one runs out of juice. A gas-powered generator could work in a pinch, but bear in mind the unit’s operating noise level, size, weight, and of course, the need for gasoline.

In our study, we used a prototyping box that we built a while back. This allowed us to test the usability of the GUI prototype in a similar way to how we would in an indoor lab environment. Furthermore, by putting the prototype box on a height-adjustable workbench or table, we were able to optimize the working height for each participant. To streamline setup, simply collect the participant’s height ahead of time to calculate where the table needs to be positioned, or give the participant instructions to help them identify the proper height themselves.
Keep in mind that there are privacy limitations with this research method. Be smart about where you place your impromptu lab to discourage onlookers from interrupting or seeing sensitive information. You might also consider setting up a perimeter with tape or traffic cones as well. In our study, for example, we used a foldable privacy screen that is usually placed between patient beds in a hospital setting.
Homework-Driven Research

The idea of having participants complete “homework” before their scheduled study sessions has an established history in UX and Human Factors. But for a few reasons, it seems to have fallen out of favor amongst professionals over the last decade or so. For starters, it’s hard to convince a participant to complete a bunch of work before their study session.
Plus, there are few safeguards against those who have put in little (or no) effort into their homework. As a result, you are putting all of your eggs into one basket, so to speak. If your participant showed up unprepared, you’d have to scramble (pun intended) to figure out if you should dismiss them altogether, or make up the work on the fly.
At least in our experience, these “what if’s” used to outweigh the benefits. But in a COVID-19 world, the variables pressing on the scale are different altogether. On a positive note though, with a few simple changes in how homework is viewed and communicated to participants during the recruiting phase, this approach can demonstrate its value time and time again.
Reinforcing Homework
Rather than homework being a “supplement” to the study, frame it as the “backbone” of the study. That way, participants learn that completing the homework is the only to receive compensation. And, speaking of compensation, make sure you pay participants sufficiently for this extra time completing their homework.
The more serious you treat it, the more they will too. If you are concerned about attrition, consider paying participants for the “homework part” and “study session part” after they’ve completed the in-person part of the study. This will serve as an incentive for completing everything.
Another way to reinforce that homework is completed in time is to set specific milestones or check-in points prior to your study session. For instance, instruct participants to upload the content they want to talk about to a shared, secure server at least 48 hours prior to their session.
This gives the research team an opportunity to check-in and send reminders (or dismissals) to those that aren’t prepared. It also lets the team arrange these files into a program or slides prior to the study to make the session run smoother. The team can work together to brainstorm the appropriate order to present and discuss these materials to minimize possible biases or leading questions.

If necessary, ask the participant to bring printed copies of their selections to avoid multiple people touching the study materials. Just be mindful of how much you are asking a participant to print — ink can be prohibitively expensive. Or, print the materials yourself and hang them on a wall or behind a window; a place designated for the “researcher(s)”. The participant can still lead the discussion through the use of a laser pointer, or by referencing numbers or letters written ahead of time to each asset.